mapping projects
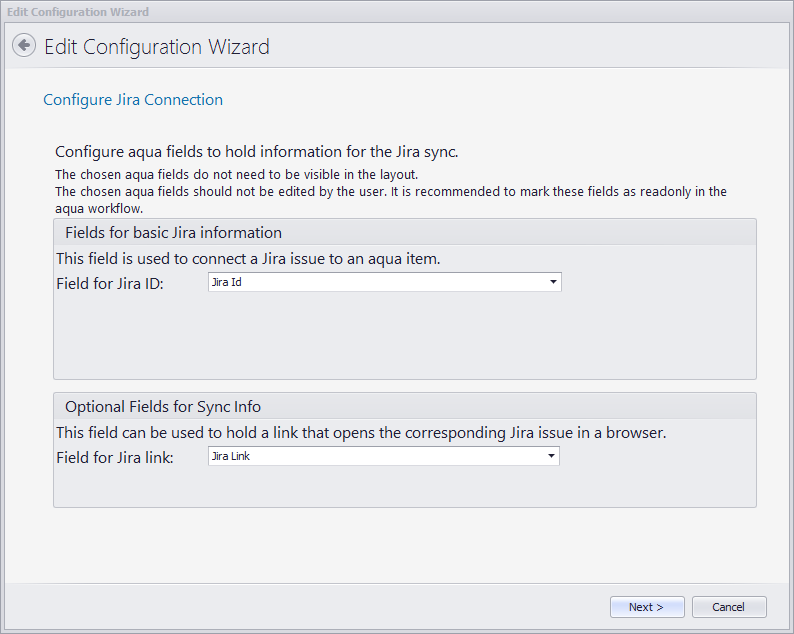
This step is needed for aqua. There have to be four preconfigured aqua custom text fields that are used to store and hold issue information for the Jira sync. This information is obtained from a specific Jira issue and is used to differentiate between all issues stored in the folder. While these four fields are necessary to store information, they don’t need to be displayed in aqua’s defect layout:
Jira ID (mandatory): this is the Issue ID given by Jira for each issue. The name is structured with the letters of the Jira Project Key first, followed by the issue number. For example, the first issue created in our project “Test syncronization (TS)” would have the JIRA ID: TS-01. Choose JiraID.
Jira link (optional): clicking on the link in this field will open the predefined browser and will display the specific issue in Jira. Choose JiraLink.
After choosing the right fields in each drop down menu, click on Next >
There are four columns in this step:
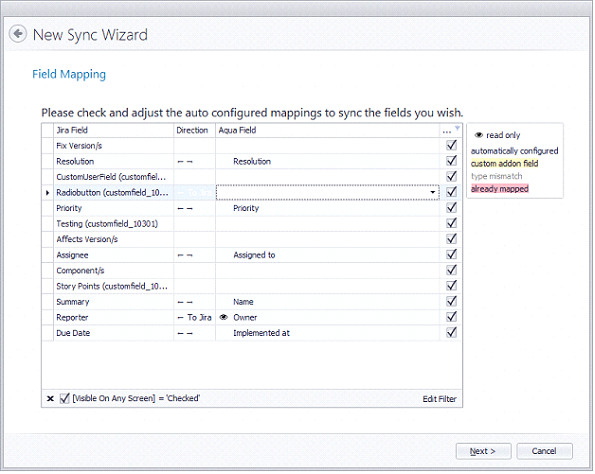
- Jira Field: the left column displays all the fields found in the configured Jira project. In our case, it will display all fields found in the project “Test Syncronization (TS)”. Custom fields have a custom field number next to the name (for example: customfield_10010).
- Direction: the center column gives two synchronization directions. Synchronization between both aqua and Jira or only from aqua to Jira. This will set the direction of the synchronized values.
- aqua Field: this column displays Jira’s name for all fields found in the configured aqua project. In our case, it will display all fields found in the project “JIRA-Sync”. Each cell pertains a drop-down menu. This enables the user to adjust the correct aqua field to the desired Jira field. Fields that do not share the same type (i.e date field with text field) will be shown in gray. Fields that are already taken, will be highlighted in red.
- Visible on any screen: in this column, there is an option to ensure that a field is always shown in Jira Screens (separate windows which pop out in Jira, i.e when editing or creating issues).
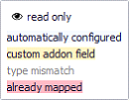
The legend box on the right-hand side informs the user which fields were automatically set by Jira. This happens when there are specific field types (i.e. fields with numerical value). If the same aqua field is taken in a different Jira field, both cells will be marked red with an error message at the bottom: “There are multiple mappings to the same aqua field.”
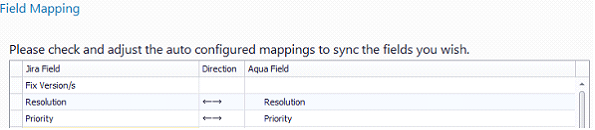
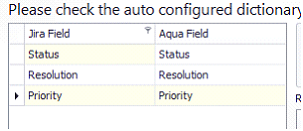
Let us say we wish to map the Jira fields “Resolution” and “Priority” with the aqua fields that have the same name “Resolution” and “Priority”. The correct mapping for this scenario would look like this:
Following correct mapping, the Next >button will be enabled. Click on it to proceed to the next step.
So, the fields were already synchronized between aqua and Jira. But some fields also have specific values, for example fields with multiple choices. Fields such as “Priority” can have the values Trivial to Blocker. Starting with aqua 18.2 it is possible to sync sprint fields. Thus, you can synchronize your Jira board with the agile board in aqua. In this step, field values are adjusted between aqua and Jira.
There are three main areas here. The left-hand area shows which of the predefined mapped fields were adjusted between aqua and Jira in the last step. The difference is that these fields require specific value mapping. This is why they are shown here. For our example, we have multiple values for Status, Resolution and Priority:
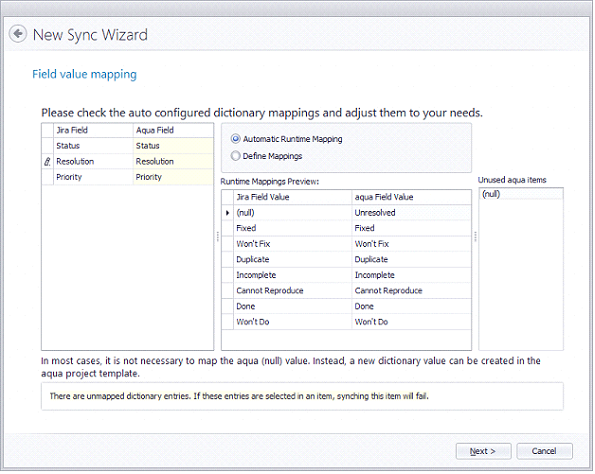
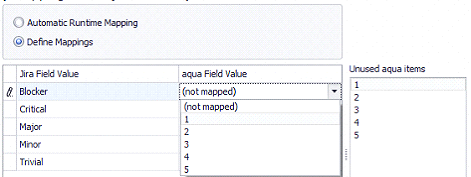
Some fields are mapped automatically (Automatic Runtime Mapping). Especially when both aqua and Jira fields have the same name. If there was a mistake within the automatic mapping, you can define it manually. To do so, click on Define Mappings. This will enable the drop down menu in aqua Field Value”. The right table will show all unused aqua defined values that were set as custom values in the synchronized aqua project. In our example, we have defined the custom values 1, 2, 3, 4, and 5 in the project “JIRA-Sync” for the aqua field “Priority”. For example, if we want the Jira value “Blocker” to be recognized in aqua with the value “1”, we adjust it respectively. For our example, we will set all values from 1 to 5 (Trivial) respectively. When finished, click on Next >.
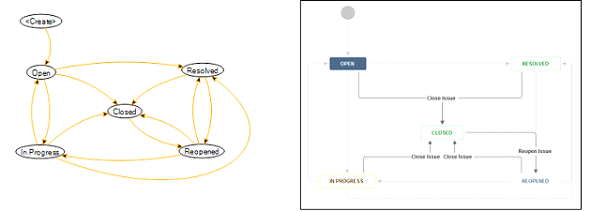
A detailed explanation and definition of workflows can be found in the chapter Workflows. Examples of typical workflows are shown the following pictures:
If the wizard receives all the steps configured in Jira’s Issue workflow, which can be found in the synchronized projects, (you can edit these steps as an administrator in both aqua and Jira) you will receive the following message:
“Jira workflow configuration read successfully.”

Please click on Next >.
We have now arrived at the wizard’s final step. The configuration that we are creating needs a specific name to differentiate it from other configurations. The predefined Sync Name is formed as “Jira(Project key)< - >aqua(aqua project)”. This name can be changed. This field may not remain empty or contain more than 255 characters. The names may not be equal to existing Syncs.
The time given in the field Sync Interval is the synchronization time interval. In our example, we will set 30 seconds as a standard synchronization interval. This means that the synchronization that we are configuring will run every 30 seconds. You can see at which exact point in time the last synchronization was run with the field Sync Time.
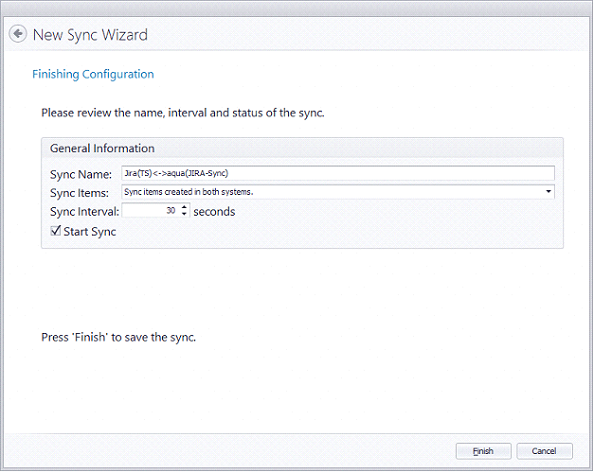
The checkbox “Start Sync” should be activated if we want the configuration to run immediately after clicking on Finish. Make sure this check box is activated and click on Finish.